(Days until hiking commences: 5)
Bear with me here. This post is going to be LONG.
When gearing up for a long-distance hike, a person can quickly become overwhelmed by the sheer volume of outdoor equipment on the market today. There are internal frame packs, external frame packs, and frameless packs; there are freestanding tents, non-freestanding tents, and partially-freestanding tents; there are single-walled tents, double-walled tents, tarps, tarp-tents, ultralight hammocks, and bivy sacks; there are white gas stoves, denatured alcohol stoves, isobutane-propane canister stoves, esbit stoves, and wood burning stoves; there are pump-operated filters, gravity filters, water purifiers, ultraviolet water sterilizers, and numerous chemical water treatments. But this is only the beginning. Imagine, if you will, trying to sort through a never-ending horde of synthetic materials - polyester, mylar, capilene, pertex, goretex, tyvek, polyurethane, polopropylene, cuben fiber, spinnaker fiber, silicon, nylon, silicon-impregnated nylon, ripstop nylon, cordura nylon, 30-denier ballistic airlight calendered nylon (you get the idea) - as you desperately attempt to understand the most appropriate applications for each. Truly, it's enough to make even the most ardent of gear lovers run for the hills.
In short, there are quite literally thousands of decisions the aspiring thru-hiker must make while gearing up for a long-distance trek; you see, when you are carrying all your possessions on your back for six months, each item becomes part of a constant balancing act between considerations of weight, comfort, and safety. As for me, the majority of my previous backpacking experience has been done with old, heavy, hand-me-down equipment, so coming into this I knew I had a substantial amount of work ahead of me. Over the past five months, I have spent countless hours - I mean COUNTLESS hours - wading through the disorienting waters of the outdoor retail industry. Sometimes, after a long period of serious contemplation over a single piece of gear - say, what density of closed-cell foam to use for my sleeping pad - I would finally come to what I thought was a confidently informed decision, only to open a new door and have yet another array of pertinent and necessary considerations appear before me. On some days, it was asking enough just to keep my head above water (at this point, I would like to mention how appreciative I am of the patience my friends and family have shown as I have endlessly contemplated such matters out loud, often without provocation). Fortunately, with time I have gradually been able to familiarize myself with most of the ins and outs of modern backpacking gear. What follows is a list of everything I will be taking on my thru-hike - every strap, dropper bottle, and mini ziplock baggie has been accounted for. In addition, I have attempted to provide readers with an idea (in extremely abridged form) of why I chose each particular piece of gear. As always, I am more than happy to answer any further questions that anyone might have. Total pack weights are listed at the bottom of this post.
Pack
Pack: REI Ridgeline 65L (4 lbs)
This is a little heavier than I wanted to go, but this pack fits me better than anything else I tried on. Most of the packs that fit the length of my torso were too large around the hips, but the Ridgeline features a removable hipbelt, so I was able to pair the medium pack with the small hipbelt. When it comes to packs and shoes - arguably your two most important pieces of gear on any long hike - a good fit is paramount. As experienced hikers are fond of saying, the right fit is always a better choice than the so-called "right" piece of gear.
Pack Cover: REI duck's back 80L (5.1 oz)
Polyurethane, 100% waterproof. One size bigger than the pack so that it fits over my sleeping pad, which I strap to the outside of my pack.
Shelter
Tent: Six Moons Designs Lunar Solo (1 lb 10.9 oz)
Most modern tents are constructed using a "double-walled" design consisting of two parts: the main body of the tent, which is constructed primarily out of mesh, and the detachable rainfly. While this design does much to eliminate condensation, it tends to produce a much heavier tent than single-walled tents of similar size. My tent is a single-walled tarp-tent. Tarp-tents employ in their construction the advantages of both tarps - the ultimate in lightweight - and tents, which provide full protection from insects and the elements. The Lunar Solo is essentially a 360-degree tarp with a hanging bug net and bathtub floor connected to the ceiling. It is not freestanding, meaning it must be staked out during use, but it sets up with relative ease. This tent sets up using a single trekking pole, a design feature that eliminates the need to carry additional tent poles (one of the principal tenets of lightweight backpacking is finding multiple uses for a single item). While all single-walled tents will by nature have at least minor issues with condensation, this tent is designed to be set up with 5 to 6 inches of clearance between the walls and the ground, a feature that helps increase air circulation significantly. Of course, the ultimate advantage of this tent is its lightweight; at well under two pounds, you won't find many lighter shelters that offer complete weather and insect protection.
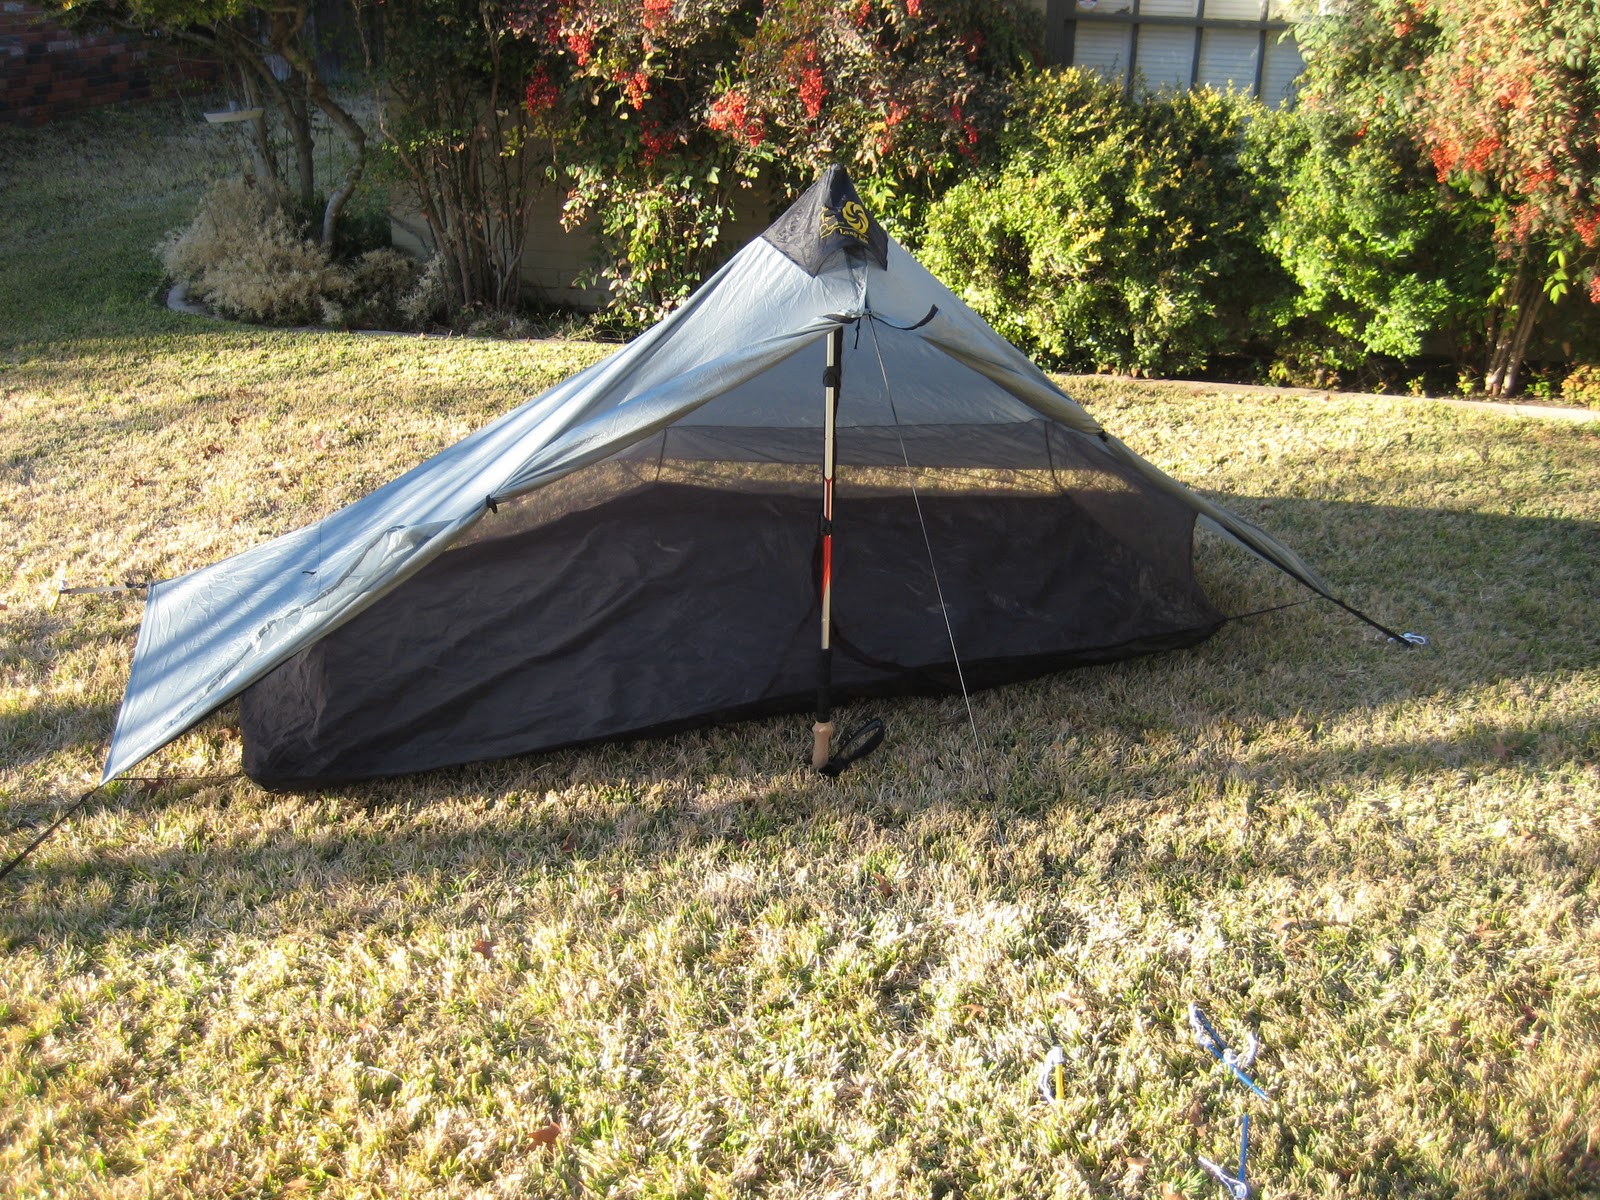 |
| Six Moons Designs Lunar Solo. |
Tyvek footprint (3.8 oz)
This is great stuff - lightweight, flexible, water-resistant (not waterproof), and extremely durable and tear resistant. Placing this under my tent will help protect the tent floor from abrasion.
(8) Easton aluminum tent stakes (4 oz)
My tent sets up with six, but the other two can be used as backups or for tying out additional guy-points.
10 ft of parachute cord for additional guylines (0.7 oz)
My tent has two additional guy-points that, when used, help maximize interior space and provide additional structural support in heavy winds. Thanks to my shakedown in the Guadalupe Mountains, I know that my tent will stay upright in sustained winds of at least 40 mph.
Sleep System
A word about materials:
When the subject of insulation arises, the question is always asked: "which is better, down or synthetic?" While new generations of synthetic insulation are significantly improved from their predecessors, the fact is that down is still lighter, packs smaller, and provides superior insulating power. However, this natural miracle fiber does have one downside (no pun intended): unlike synthetics, down loses virtually all its insulating ability when wet. The answer to the question, then, is that down is the superior insulation - as long as you can keep it dry. If the insulation is going to be exposed to water, synthetics are the clearly the better choice. The majority of A.T. hikers prefer to use a down-filled sleeping bag since it will not be regularly exposed to the elements (most people keep their down bag in a waterproof sack at the bottom of their pack), but opt use synthetic insulation in their jackets, which obviously will be seeing a lot more weather.
One last word about down: the lofting ability of down is measured in a rating system referred to as "fill power." Fill power is essentially the total area that one ounce of down fills: for example, one ounce of 600-fill down will fill 600 cubic inches of space. Down is generally rated anywhere between 150-fill and 900-fill. The higher the number, the lighter, warmer per-ounce, and more compressible the down.
EMS Mountain Lite 20-degree w/ stuff sack (2 lbs 3 oz)
750-fill goose down, packs down to the size of a football. Water-resistant Pertex nylon shell helps to protect the down from condensation. The interior is spacious enough to allow me to wear additional clothing inside on extremely chilly nights. The stuff sack can be filled with clothing to be used as a pillow.
Therm-a-Rest Ridgerest (12.6 oz)
Non-inflatable, closed-cell foam. While not as comfortable or compressible as inflatable mattresses, closed-cell foam is cheaper, lighter weight, and provides superior insulating power from the ground, which is the single most important purpose of any sleeping pad. You see, the ability of any kind of puffy insulation (down or synthetic) to keep you warm rests in its lofting ability. When you lie down in a sleeping bag, the insulation underneath your body becomes compressed which renders it practically useless (in fact, many light and ultralight bags are made without any insulation on the bottom). A sleeping pad should not be viewed as an optional luxury item, then, but rather as a necessary piece of gear that helps keep you warm on the cold ground. When the weather warms up, I will probably cut a few feet off the bottom of my pad so that it ends just past my knees, making it easier to pack and saving me a few more ounces.
 |
| Sub-zero test of sleep system. |
mylar emergency blanket, cut to pad dimensions (0.7 oz)
Many hikers carry two sleeping pads during the winter. Because I did not want to carry or pay for this additional piece of gear, I got the idea to buy an emergency blanket (the shiny ones) and cut it down to fit the dimensions of my sleeping pad. When the nighttime temperature is extra chilly, I can place this extra layer under my sleeping pad to help reflect more of my body heat back to me. For less than an ounce of weight and a packed size that fits easily into the palm of my hand, it works pretty darn well.
Thanks to last week's nationwide winter storm, I have been able to successfully test my total sleep system (including tent) to an air temperature of around 0-degrees and a wind chill of about -10.
Cooking System
MSR Pocket Rocket (3 oz)
Small canister stove. This is one hell of a stove, so much so that MSR has not changed its design for several decades. Virtually maintenance-free, it boils a liter of water in around 3.5 minutes. The fuel output is EXTREMELY adjustable; on low, the flame is barely a flicker, while on high it looks rather more like something you could launch into space. Still, I might switch to an alcohol stove partway up the trail; they are cheap to use, can be made out of a coke can, and weight less than an ounce.
4-oz. fuel canister (6.7 oz)
One canister should last me 6-7 days. While isobutane/propane-blended fuel is super fast to cook with, it is heavy and fairly expensive compared to denatured alcohol - another reason I will probably switch at some point down the road.
GSI Pinnacle Soloist (1.1L aluminum pot, insulated mug, straining lid, carrying case) (10.2 oz)
1.1L aluminum pot with folding handle, 14-oz insulated mug/bowl, straining/sipping lid that fits both pot and mug, carrying case that can be used as water basin. When packed up, I can fit my entire cooking system inside.
plastic spork (0.2 oz)
mini Bic lighter (0.45 oz)
(2) 0.5-oz dropper bottles of Dr. Bronners (1.5 oz)
Organic, fair-trade, fully biodegradable liquid soap. This stuff is AMAZING; it can be used for washing dishes, hands, hair, body, and pretty much anything else that needs cleaning. Plus, it's super concentrated, so a little bit goes a long way (I can wash my hands with three or four drops).
Hydration System
Aquamira drops (3 oz)
Water filters are heavy and prone to malfunction; by comparison, chemical treatment is super light, maintenance-free, and extremely compact. Aquamira uses a chemical called chlorine dioxide, a safer alternative to iodine that is used in many public water treatment facilities.
extra dropper bottle for mixed solution (0.15 oz)
Since Aquamira comes in parts A and B which must be mixed for 5 minutes before adding to water, I am carrying an extra mini dropper bottle to store enough mixed solution for each day. Others have done this and it does not seem to significantly reduce the chemical's effectiveness.
(2) 1L Smartwater bottles (3 oz)
"What? You're not taking Nalgene bottles?!" Nope. An average one-liter Nalgene bottle weighs 6.2 ounces. A one-liter Smartwater bottle weighs 1.5 ounces. By carrying cheap bottles, I save over a half-pound of weight. Plus, the tall, skinny shape of these bottles makes them fit in the pockets of my pack easier. Using Aquamira will help keep them from getting nasty - the stuff would be a brutally efficient tool of chemical weaponry if we ever decided to go to war with tiny aquatic organisms - but I'll still change them out every few weeks.
2L water tote (1.5 oz)
For carrying additional water if sources are scarce. Also allows me to keep more water at camp so I don't have to make multiple trips to the water source each night.
Clothing
The North Face convertible pants (1 lb 2.4 oz)
Pants and shorts in one water-resistant package. These are pretty heavy, but I already had them and didn't want to spend money on more.
Under Armour running shorts (4.4 oz)
Patagonia capilene long underwear bottoms (6 oz)
Used mostly for sleeping. Body oils that permeate the lining of your sleeping bag will slowly compromise the lofting ability of the bag's insulation, so sleeping in clothing or using a liner is a necessity. I have opted for clothing because it can also be used for hiking on very cold days.
(2) Cabela's merino wool long-sleeve shirts (12.6 oz)
Although heavier than most synthetic fabrics, merino wool is extremely warm and moisture wicking, and it also retains its insulating ability when wet. The main reason I have chosen merino in this instance is that wool has a natural and uncanny ability to resist odor. Synthetics, by comparison, can get very nasty in a relatively short amount of time. One shirt will be used for hiking and one will be used for sleeping.
 |
| Montbell Ex Light down vest. |
Montbell Ex Light down vest and stuff sack (3.8 oz)
Because I am starting in the winter, I am taking two insulating jackets instead of one. This 900-fill down vest is extraordinarily light and compresses down to the size of a Campbell's soup can. Because it is down, it will be used as my interior insulating layer.
The North Face primaloft jacket (1 lb 4.8 oz)
This jacket is super heavy by lightweight backpacking standards, but I don't want to skimp on clothing for a February hike. Primaloft is one of the warmest and most compressible synthetic insulations available. This will definitely be shipped home when I reach the warmer climes of Virginia.
Dri Ducks rain suit (jacket and pants) (10 oz)
Polypropylene. This rain suit looks extremely dorky, but it is lightweight and extremely affordable. Anyway, I don't think the bears will be laughing at me. I will probably mail the pants home when the weather warms up.
(3) pairs Smartwool socks (7.55 oz)
Wool is the preferred sock material for most hikers due to all the above listed reasons.
 |
| Injinji liner socks. |
(3) pairs Injinji toe liner socks (2.1 oz)
Liner socks wick moisture away from your feet and help prevent blister-causing abrasion. The unique individual toed design of these liners helps to reduce blisters between toes. These just came in the mail, so I haven't had a chance to hike with them yet, but I haven't ever had a blister while wearing liner socks, so consider me a liner devotee. These are made of Coolmax polyester; I wish they made them in silk so they wouldn't stink so bad, but oh well.
REI nylon/spandex boxer shorts (3 oz)
Many thru-hikers - men and women alike - choose to go "commando" while on the trail. Opting out of underwear has the distinct advantage of promoting ventilation with the added benefit of reducing pack weight (which, of course, is constantly present in almost every thru-hiker's mind). I gave it a try, and let's just say it doesn't work for me. Three ounces is a fair price to pay to eliminate chafing.
baseball cap (3.8 oz)
My trusty Top-Notch hat looks like it has been through hell and back... several times. It has accompanied me on hunting trips, backpacking excursions, a field research trip to Guatemala, and numerous fishing trips. In other words, it has been a good travel companion and I'm certainly not leaving it behind now. It might literally fall apart on my head before I reach Maine.
balaclava (1.8 oz)
Superior to a beanie since it insulates main arteries in the neck. It can also be rolled up to serve as a beanie, so there is no need to carry both.
(2) bandanas (2 oz)
Used for washing dishes, washing myself, pre-filtering debris when filling water bottles, wiping condensation from my tent ceiling, wiping sweat from my face, wetting and wearing on my head, tying off injuries, and throwing rocks over trees as part of my bear-bagging system.
lightweight liner gloves (1.6 oz)
I have a pair of heavy ski gloves I can use if it gets extremely cold, but it really doesn't look like I am going to need them.
Footwear
 |
| Brooks Cascadia 5 trail runners. |
Brooks Cascadia 5 trail running shoes (1 lb 12.9 oz)
Trail runners are basically a running shoe with the more durable outer sole of a hiking boot. While many people don't consider weight to be a significant factor when choosing footwear, it really should be taken into careful consideration. Because shoes are so far from your body's center of gravity, it takes much more effort to lift a few pounds on your feet than to lift the same amount of weight on your back. The "ankle support" of traditional hiking boots is largely a myth; I actually find that I have much better overall balance and experience less foot and ankle fatigue when wearing a lighter shoe. I will probably go through at least three pairs of of these during my hike.
Cheap flip-flops (5 oz)
Some people consider camp shoes to be a luxury item while others consider them a necessity. These are the cheapest, lightest flip-flops I could find ($2.00 at Hobby Lobby), and I think my feet will thank me at the end of the day for carrying them.
Toiletries (total weight: 15.55 oz)
glasses w/ case
contacts w/ case
While relying on glasses would save a lot of weight, I really prefer to wear contacts when out and about. Wearing glasses makes me feel detached from the outside world in a way, almost as if I'm looking at my surroundings through a car window. It sounds like a pretty minor issue, but I really don't want that feeling to pervade my A.T. experience for the next six months.
spare contacts
(2) 2-oz bottles of contact solution
This equals about half the total weight of all my toiletries. I wish there was some way I could magically make this stuff lighter.
small tube sunscreen
lip balm
small hand sanitizer
 |
| Counting eye-dropper capacity. I now know that one 0.5-oz bottle holds 482 drops of low viscosity fluid. |
toothbrush (w/ shortened handle) & toothbrush cover
The real "gram weenies" out there cut off their toothbrush handles to save weight. I just shortened mine a bit so that it fits better into the ziplock bag.
small tube toothpaste
small mirror
Anyone who has ever dealt with an impossibly elusive eyelash on their contact lens will understand exactly why I'm carrying this. It can also be used to signal for help in case of an emergency. After several days on the trail I probably won't want to look at myself much in it. It weighs exactly one ounce.
1-quart ziplock bag for all toiletries
First Aid (total weight: 8.3 oz)
You may be beginning to notice a trend here. There is no reason to carry more of any one item than is necessary. For example, you are not going to need an entire tube of Neosporin in one two-week period (if you do, you probably shouldn't ever leave your house), so take a few individual doses instead. The same applies to bandages, medication, and just about any other consumable item you carry. Repackage everything you can. The weight of these items may seem fairly insignificant, but when packing a full pack you begin to realize that ounces quickly accumulate into pounds.
(2) ind. doses cortisone cream
(2) ind. doses neosporin
4" x 4" gauze pad
(2) regular band-aids
(2) butterfly bandages
(4) blister bandages
small roll tums
(3) mini plastic bags w/ Advil, Benadryl, Zyrtec, multivitamins, Meloxicam (anti-inflammatory), Tramadol (pain reliever)
small tube Pennsaid (topical anti-inflammatory)
Nasalcrom (for allergies)
inhaler (for mild asthma)
small Gold Bond
(2) extra mini ziplocks (for opened packages of cortisone & neosporin)
1-quart ziplock bag for all first aid
Miscellaneous
Black Diamond Ergo Cork trekking poles (1 lb 3.55 oz)
I use to look at these and think they were a pointless waste of money, but I decided to give them a try after learning that practically everyone who finishes the trail ends up buying a pair sooner or later. After using them for the first time during my shakedown, consider me the president of the trekking poles fan club. These things are simply WONDERFUL. If you've ever pressed your hand down on a scale, you will know that it is relatively easy to press down with ten or even twenty pounds of force. When you hike with trekking poles, that ten or twenty pounds is transferred from your legs to your arms with every step. This isn't just "in theory" - you can actually feel the trekking poles distributing the workout through your body as you hike. In addition to taking weight (and therefore stress) off of your legs, hiking with trekking poles also significantly improves your balance. I almost felt like I had four legs while hiking the Guadalupe Peak Trail, and those brief stumbles that sometimes occur with the onset of fatigue were completely eliminated.
Leatherman Micra multitool (1.7 oz)
Includes scissors, knife, file, can opener, bottle opener, flathead screwdriver, large and small Phillips screwdriver, and tweezers.
Bear bagging system: 40 ft parachute cord, 20L nylon food bag, mini carabiner, (3) freezerbags for food and trash (6 oz)
When hiking in bear country (the entire A.T. is in bear country), it is necessary to store food, toiletries, and all other scented items away from camp and out of the reach of bears each night. Hanging a bear bag from a tree is the lightest and most commonly-used method. There are many different bear-bagging techniques, but the PCT method is my technique of choice.
extra mini carabiner (0.1 oz)
mesh stuff sack for first aid, toiletries, electronics, cards & cash, fire kit, field repair kit (1.3 oz)
plastic bag w/ $100 cash (in twenties), driver's license, debit card, health insurance cards (0.85 oz)
map & compass (4.3 oz)
ALDHA Thru-Hiker's Companion (10.7 oz)
My guide book of choice. Provides more detailed information about the trail, notable landmarks, shelters, and water sources than maps. Most importantly, it provides what maps do not: information about the availability of services in nearby towns (laundry, post office, grocery, restaurants, lodging, outfitters, etc.).
sunglasses w/ case (1.9 oz)
digital camera w/ 2 GB memory card and extra battery (5.9 oz)
harmonica (2.3 oz)
It's going to be hard enough not being able to play sax, guitar, or bodhrán for six months. Consider this my addition to the Ten Essentials of Backpacking. A gift from my friend, Solomon.
Irish tinwhistle (1.15 oz)
See above. The whistle I'm taking conveniently breaks down into two pieces and was a gift from my friend, Michael.
digital waterproof wristwatch w/ stopwatch and timer (0.9 oz)
cell phone (for town visits) (6.8 oz)
emergency fire starter kit (waterproof matches & strike pad, dryer lint, 1/3 firestarter stick) (0.4 oz)
plastic bag w/ toilet paper & extra plastic bag for used toilet paper (0.45 oz)
visor clip light w/ extra batteries (0.7 oz)
micro LED flashlight (0.35 oz)
field repair kit (3 safety pins, 2 needles, polyester thread) (0.1 oz)
(2) extra straps (for securing sleeping pad to outside of pack) (1.2 oz)
iPod w/ headphones (7.6 oz)
Strictly a luxury item, but it can be a significant morale booster on tough days. The downside is that it weighs almost half a pound. Some people bring an iPod Shuffle or Nano, both of which are obviously much lighter in weight, but there is absolutely no way I could narrow down my music enough to fit on either one of these; plus, I don't really want to pay for one anyway. While I will probably start the trail with my iPod, I am considering leaving it in my bounce box at some point down the road. The spirit of deprivation that characterizes life on the trail is a significant part of the A.T. experience for many hikers (it sounds a bit masochistic, and it is), and going without my music for six months will surely have an influence on how I listen when I return (absence makes the ears grow fonder?).
book (starting with Lila by Robert Pirsig) (8.1 oz)
Another heavy luxury item that I am slightly hesitant to carry. Because the days are so much shorter this time of year, I will be spending a lot more time in my tent, so some form of entertainment will definitely be welcome. Still, between the iPod and the book, we are talking almost a pound of extra weight.
loose leaf notebook paper for journal (0.5 oz)
Weighs less and packs smaller than any form of miniature journal or notebook you can find.
Sharpie pen w/ duct tape & medical tape (0.5 oz)
 |
| Sharpie with duct tape and medical tape at weigh-in. |
knee brace (8.4 oz)
If I manage to hike for a few months without experiencing any knee pain (a long shot, I know), I'll be happily ditching this bulky half-pound.
SPOT GPS (4.1 oz)
The SPOT has no maps, no calling capability, and no keypad for typing messages. It is simply a locator beacon with a few buttons for signaling SOS in case of emergencies and for signaling my family to let them know I'm okay. 4.1 ounces is well worth some peace of mind.
Total Base Weight: 20 lbs
Includes the loaded pack with everything except food, water, and fuel.
Total Weight On Back at Beginning of Five-Day Trek: 35 lbs
Base weight plus five days of food, 2 liters of water, and one full canister of fuel. Does not include weight of clothing being worn.
Total Skin-Out Weight: 39 lbs
Everything in my possession including the clothes on my body (weight you are also carrying if you think about it).
 |
| Gear ready to be packed. |
_____________________________________________________________________
Bounce Box:
These are the items I will be packing in the bounce box that I will mail to myself along the trail. I will have access to them about every two weeks on average. Everything listed here fits nicely into a standard-sized shoebox.
Dr. Bronner's soap
ziplock bags (mini, medium, large)
sunscreen
Zyrtec, Benadryl, Advil, multivitamins, Tramadol (pain reliever)
Meloxicam, Pennsaid (anti-inflammatories)
contact lenses
contact solution
nail clippers
Gold Bond
duct tape and medical tape
blister pads
band-aids
cortisone & antibiotic cream
cell phone/iPod, & camera chargers
(2) extra 2-GB SD memory cards
camera USB upload cable
upcoming trail maps
spork
Aquamira
BIC lighter
loose leaf paper
bandana
razor
extra mini dropper bottles
mosquito headnet
$100 cash (in twenties)


